Add a Quick Launch Toolbar to Windows 7, 8, 8.1 & 10

By default, the Quick Launch bar is not available in Windows 7, 8, 8.1 & 10. To open programs quickly, you can drag the program icons to the taskbar.

However, you can follow the steps in this article to restore the Quick Launch bar and the Show Desktop button as it was in Microsoft Windows Vista and Windows XP.

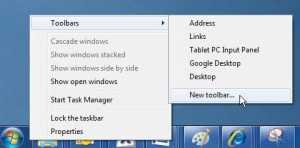
1. Right-click an empty area of the taskbar, point to Toolbars, and then click New Toolbar.

quicklaunch-win7

2. In the dialog box, copy and then paste the following folder name to the Folder box, and then click Select Folder:

Windows 7
%AppData%\Microsoft\Internet Explorer\Quick Launch

Windows 8, Windows 8.1 & Windows 10
%UserProfile%\AppData\Roaming\Microsoft\Internet Explorer\Quick Launch

Note that on Windows 10, you will have to keep the Taskbar Search Icon set to HIDDEN.

Change Windows Startup Sound

From http://winaero.com/download.php?view.10

Startup Sound Changer

Startup Sound Changer

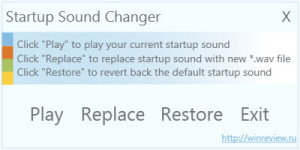
Startup Sound Changer allows you to change startup sound in Windows 7 and Windows Vista (the chimes that you hear at your Windows Welcome/Logon Screen).

There is no option to change it with system settings, so Startup Sound Changer provides that useful tool for those who are bored with the default Windows sound.

Moving the Default Documents Folder

Windows 8, Windows 7 and Windows Vista

In Windows 8, Windows 7 and Windows Vista, there are libraries that are named after your user name. These libraries contain links to the folder locations for Documents, Favorites, Downloads, Music, Videos and Pictures. Any of these can be moved by using the same directions below, by substituting Documents with the item you want to move.

my_documents-library


Tip
Instead of redirecting a folder, you might want to consider including a folder in one of your libraries. For example, if you have a large number of pictures, you can store those pictures in a location other than your primary hard drive, then include that location in your Pictures library.


Moving My Documents

  1. On the drive to which you want to move your Documents folder, create the directory Documents or make it a different name.
  2. Click the Start button, and then click your user name. This will bring up the library.
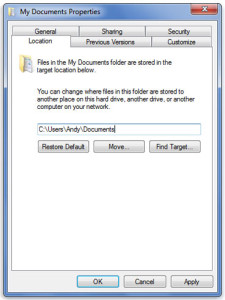
  3. Right-click My Documents, and then select Properties.
  4. Click the Location tab and then click Move.
  5. Browse to the location where you created your folder in step one.
  6. Click the folder you created in step one, click Select Folder, and then click OK.
  7. In the Move Documents box, click Yes to move your documents to the new location.

my_documents-properties
Restoring Default Location

  1. Click the Start button, and then click your user name. This will bring up the library.
  2. Right-click My Documents, and then select Properties.
  3. Click the Location tab, click Restore Default and then click OK.
  4. Click Yes to recreate the original folder, and then click Yes to move your documents back to the original location.


Windows XP

In Windows XP, all the downloads, music, videos and pictures are contained in the My Documents folder. The Favorites folder is an actual folder in Windows XP rather than a link from the desktop or a library like in Windows 7 and Windows Vista. It is best to leave Favorites in its default location.

Moving My Documents

  1. On the drive to which you want to move your Documents folder, create the directory Documents or make it a different name.
  2. Locate the My Documents icon which is located on your desktop or start menu.
  3. Right-click My Documents, and then select Properties.
  4. Click the Target tab.
  5. Browse to the location where you created your folder in step one.
  6. Click the folder you created in step one, click Select Folder, and then click OK.
  7. In the Move Documents box, click Yes to move your documents to the new location.

Restoring Default Location

  1. Locate the My Documents icon which is located on your desktop or start menu.
  2. Right-click My Documents, and then select Properties.
  3. Click Restore Default, and then click OK.
  4. In the Move Documents box, click Yes to move your documents to the new location, or click No to leave your documents in the original location.

Windows 8 – Windows 10 Start Menu

Where is the Start menu?

The Start screen replaces the Start menu in Windows 8/8.1, Windows 10 and Windows RT.

How to Use it

Open Start by swiping in from the right edge of the screen (or if you’re using a mouse, pointing to the upper right corner of the screen and moving the mouse pointer down), and then tapping or clicking Start. Update: 8.1 has returned the Start Button – but still no Menu. The version that came out with Windows 10 will serve the needs of most, but many will prefer the older Windows 7 style Start Menu.

Well, fortunately you have a few options:

1. Suck it up and get used to Windows 8/8.1 or make do with the new Windows 10 style Start Menu.

2. If you are using Windows 8/8.1, upgrade to Windows 10

3. Add a Windows 7 style Start Menu using Third Party software.

Since you are reading this, I doubt you are willing to suck it up, and so it’s Third Party software that you want.

Stardock Start8 and Start10

Cost: Free to try for 30 days, and then $4.99. Or you can jew Start8 with a simple search of tehPARADOX.com Online Sharing Community or half a million other places around the net.

System Requirements: Windows 8/8.1 or Windows Server 2012

Where to Get it: http://stardock.com/products/start8/

http://www.stardock.com/products/start10

What is Start8/Start10?

  • Windows 7-style Start menu with Windows 8 enhancements
  • Search for Windows 8-style (Modern UI) apps
  • Pin desktop and Metro apps to the start menu
  • Jump List support
  • Unified Search for apps, settings and files
  • Boot directly to the Windows 8 desktop
  • One click access to shut down, devices, music, documents, and videos
  • Optionally disable the desktop Windows 8 “hot spots”
  • Supports WindowFX 5.1 start menu animations
  • Includes .ADMX template (in GroupPolicy folder)

Start8 – A Start Button for Windows 8


Lee-Soft ViStart 8.1

Cost: Free

System Requirements: Windows 8.1, Windows 8, Windows 7, Vista or XP

Where to Get it: http://lee-soft.com

ViStart 8 has all the functionality the Windows 7 Start menu has and then some more. ViStart 8.1 is completely skinable and there are already a lot of extra start menu skins and start menu buttons available to customize your Windows look that you can download from the lee-soft.com website.

  • The original features of the windows 7 start menu
  • Boot directly to the windows 8 desktop
  • Advanced search (includes also windows “metro” apps and displays them in a separate category)
  • Search & start “metro” apps directly from the start menu
  • Pin “metro” apps to the start menu
  • Switch button in the start menu to switch to the “metro” app desktop
  • Custom start buttons “there is a selection of free start buttons on the lee-soft.com website)
  • Completely skin able “ you can give your start menu a custom look”
  • Free skins “ there is a special gallery with free skins on lee-soft.com to customize you start menu”

ViStart – A Start Button for Windows 8

Windows Advanced Boot Options

What is the Advanced Boot Options Menu?:

The Advanced Boot Options menu is a selectable list of Windows startup modes and troubleshooting tools.

In Windows XP, this menu is called the Windows Advanced Options Menu.

Beginning in Windows 8, Advanced Boot Options was replaced by Startup Settings, part of the Advanced Startup Options menu.

What is the Advanced Boot Options Menu Used For?:

The Advanced Boot Options menu is a list of advanced troubleshooting tools and Windows startup methods that can be used to repair important files, start Windows with the minimum necessary processes, restore previous settings, and lots more.

Safe Mode is the most commonly accessed feature available on the Advanced Boot Options menu.

How To Access the Advanced Boot Options Menu:

The Advanced Boot Options menu is accessed by pressing F8 as the Windows splash screen begins to load.

This method of accessing the Advanced Boot Options menu applies to all versions of Windows that includes the menu, including Windows 7, Windows Vista, Windows XP, etc.

In older versions of Windows, the equivalent menu is accessed by holding down the Ctrl key while Windows is starting.

How To Use the Advanced Boot Options Menu:

The Advanced Boot Options menu, in and of itself, doesn’t do anything – it’s just a menu of options. Selecting one of the options and pressing Enter will start that mode of Windows, or that diagnostic tool, etc.

In other words, using the Advanced Boot Options menu means using the individual options contained on the menu screen.

Advanced Boot Options:

Here are the various tools and startup methods you’ll find on the Advanced Boot Options menu across Windows 7, Windows Vista, and Windows XP:

Repair Your Computer

The Repair Your Computer option starts System Recovery Options, a set of diagnostic and repair tools including Startup Repair, System Restore, Command Prompt, and more.

The Repair Your Computer option is available in Windows 7 by default. In Windows Vista, the option is only available if System Recovery Options has been installed on the hard drive. If not, you can always access System Recovery Options from the Windows Vista DVD.

System Recovery Options isn’t available in Windows XP so you you’ll never see Repair Your Computer on the Windows Advanced Options Menu.

Safe Mode

The Safe Mode option starts Windows in Safe Mode, a special diagnostic mode of Windows. In Safe Mode, only the bare necessities are loaded, hopefully allowing Windows to start so you can make changes and perform diagnostics.

There are actually three individual options for Safe Mode on the Advanced Boot Options menu:

Safe Mode: Starts Windows with the minimum of drivers and services possible.

Safe Mode with Networking: Same as Safe Mode, but also includes drivers and services needed to enable the network.

Safe Mode with Command Prompt: Same as Safe Mode, but loads the Command Prompt as the user interface.

In general, try Safe Mode first. If that doesn’t work, try Safe Mode with Command Prompt, assuming you have command-line troubleshooting plans. Try Safe Mode with Networking if you’ll need network or Internet access while in Safe Mode.

Enable Boot Logging

The Enable Boot Logging option will keep a log of the drivers being loaded during the Windows boot process.

If Windows fails to start, you can reference this log and determine which driver was last successfully loaded, or first unsuccessfully loaded, giving you a starting point for your troubleshooting.

Enable low-resolution video (640×480)

The Enable low-resolution video (640×480) option decreases the screen resolution to 640×480, as well as lowering the refresh rate. This option does not change the display driver in any way.

This Advanced Boot Option tool is most useful when the screen resolution has been changed to one that the monitor you’re using can’t support, giving you an opportunity to enter Windows at a universally accepted resolution so you can then set it to an appropriate one.

In Windows XP, this option is listed as Enable VGA Mode but functions exactly the same.

Last Known Good Configuration (advanced)

The Last Known Good Configuration (advanced) option starts Windows with the drivers and registry data that were recorded the last time Windows was successfully started and then shut down.

This tool on the Advanced Boot Option menu is a great thing to try first, before any other troubleshooting, because it returns a lot of really important configuration information back to a time when Windows worked.

If a startup problem you’re having is due to a registry or driver change, Last Known Good Configuration could be a really simple fix.

Directory Services Restore Mode

The Directory Services Restore Mode option repairs the directory service.

This tool on the Advanced Boot Options menu is only applicable to Active Directory domain controllers and has no use in a normal home, nor in most small business, computer environments.

Debugging Mode

The Debugging Mode option enables debug mode in Windows, an advanced diagnostic mode where data about Windows can be sent to connected “debugger.”

Disable automatic restart on system failure

The Disable automatic restart on system failure option stops Windows from restarting after a serious system failure, like a Blue Screen of Death.

If you can’t disable automatic restart from within Windows because Windows won’t fully start, this Advanced Boot Option suddenly become very useful.

In some early versions of Windows XP, the Disable automatic restart on system failure is not available on the Windows Advanced Options Menu. However, assuming you’re not dealing with a Windows startup issue, you can do this from within Windows: How To Disable the Automatic Restart on System Failure in Windows XP.

Disable Driver Signature Enforcement

The Disable Driver Signature Enforcement option allows drivers that are not digitally signed to be installed in Windows.

This option is not available on Windows XP’s Windows Advanced Options Menu.

Start Windows Normally

The Start Windows Normally option starts Windows in Normal Mode.

In other words, this Advanced Boot Option is equivalent to allowing Windows to start as you do every day, skipping any adjustments to the Windows startup process.

Reboot

The Reboot option is only available in Windows XP and does just that – it reboots your computer.

Advanced Boot Options Menu Availability:

The Advanced Boot Options menu is available in Windows 7, Windows Vista, Windows XP, and the Windows server operating systems released alongside those versions of Windows.

Beginning in Windows 8, the various startup options are available from the Startup Settings menu. The few Windows repair tools available from ABO moved to Advanced Startup Options.

In earlier versions of Windows like Windows 98 and Windows 95, the Advanced Boot Options menu was called the Microsoft Windows Startup Menu and functioned similarly, although without as many diagnostic tools as is available in later versions of Windows.

With thanks to http://pcsupport.about.com/od/termsag/p/advanced-boot-options.htm